


This cute bag came from the fabric of a wide pant leg!
The difficulty of this project is MODERATE, because you’ll be working from scratch. Perseverance is the key.
………………………………………..
Beat the high cost of fabric-by-the-yard from a cloth store by buying inexpensive clothing from a thrift store! Just make sure you check it over for stains or holes, at least in the part you want to use.
- Buy a piece that you don’t want for the piece itself…but because you love the material. Large and extra large garments—or, men’s shirts—yield more fabric. 🙂
- You can make small items from articles of clothing: purses, for example, from sturdy fabric, such as, denim, corduroy or velvet—OR, drapes, upholstery material…You get the idea. You can use shirts, skirts or shower curtains, etc. for lining, or trim, for instance, and more!
- Don’t forget lace curtain panels! Use these for anything lacey: such as, trim, “under skirts,” even for lace kimonos!
- T-shirt knit is great for making fringe because it doesn’t fray. But, making fringe requires a steady hand and a sharp pair of scissors to make your cuts straight and even.
- Belts may be used for purse straps.
………………………………………………………………………………………….
- Don’t disregard buying garments for the buttons!
After visiting a fabric and craft store, recently, to find a button or some kind of closure, I got discouraged with the prices and stopped by one of my fave thrifts to try to find what I wanted.
Well, I didn’t. But, I chatted with the shop manager and he said a woman told him she was buying a 25-cent garment to get the buttons. He said he thought that was crazy till he found out how expensive buttons were!
………………………………………..
I found a pair of pants (for 25 cents!) that I wanted to use for the fa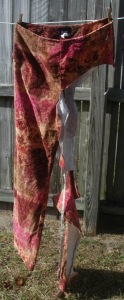 bric. It had wide legs—all the better for using the fabric!
The pant leg told me it wanted to be a purse.
I drew out on paper my main pattern. By no means, does your pattern need to be the exact size/ dimensions—or, even the same shape as mine. Do your own thing. This tut is to stimulate your imagination. 😀
These (below) are the pieces you’ll need to make if you’re following my example. This is only a rough sketch—not in proportion.

Wash the garment before beginning the project.
Choose a thread color that will become invisible on your material. I used a lighter thread the first time around. (Yes, I remade my bag, ’cause I didn’t like the way I made it the first time—and, I still had another pant leg. 🙂 ) The second time, I used a dark thread that matched the darker colors of the fabric…liked that much better!
The body of the bag:
Draw half the shape of the purse on one 8 1/2 x 11-inch piece of paper

and tape it together with another piece of paper of the same size along the straight side of the pattern—to make a whole pattern— and cut them out together, so they’ll be the same.
Trace the opened-out pattern two times on the back side of the material and cut out the pieces.
Turn the top edge of the “neck” over about 1/4 inch—toward the wrong side of the material—and straight stitch a hem, turn it over again about 1/4 inch—and sew. Now you’ve finished that edge.
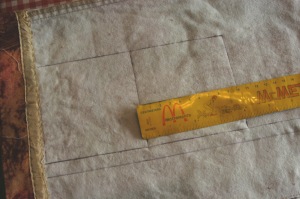
Measure the length around the outside curvy part of the bag—add a little extra for good measure: You can always cut off the extra, but you can’t add more length if you miscalculated! (Spoken from experience!) With this measurement, you are going to make a long, narrow rectangle of fabric to make your purse roomier.
Measure with a yardstick on the back side of your pant-leg fabric (wrong side of the print). 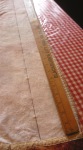 Mark out a long, narrow rectangle by drawing two parallel
  lines (the length you measured around your purse) 2 to 3 inches apart (your choice) and finish out the rectangle with two short lines on the ends (left). Cut it out. This strip will be the sides/ bottom of your purse, as shown on right.
Then, start straight stitching this long strip onto one of the large body pieces of your bag, right sides together, starting at the top on one side, going all around the curves to the top of the other side, allowing 1/4- to 1/2-inch seam. Sew the second large piece, matching it to the first, right sides together, and adding it to the opposite side of the strip, allowing 1/4- to 1/2-inch seam. After that, zig-zag along the raw edges to prevent unraveling. Turn it right side out and you have the body of your bag done. 😀
The flap:
Then, draw a paper pattern for the flap that will hang across the top opening of your bag. Mine, shaped like the letter “U” with a flat top, (rough sketch below) is approx. 7 x 8 1/2-inches. Make two tracings on the wrong side of the cloth. Cut out both pieces. Put the right sides together, matching the shapes, pin them together, sew them together around all sides but the flat side, allowing 1/4- to 1/2-inch seams. Zig-zag the raw edges to prevent unraveling. Turn it right side out. This makes a little pouch, but it’s going to be the flap.
 Now, hold the bag in your hands and fold the two top corners to each other to determine the center of the top of the bag. Put a pin there, perpendicular to the top edge. Also fold the flap, corner to corner, and put a pin at the center, perpendicular to the flat edge.
  Lay the bag on the table, put the flap across it, sticking up from the body of the purse (shown on left), center pins matching (above), and make sure it’s even and straight, so, when it’s sewed on, it will fall down in the front of the bag.
Straight stitch the flap to the bag, following the previous stitching so it won’t be noticeable.
Now, for the strap:
Draw out another long, narrow rectangular-shaped strip on your cloth. I wanted my strap short, so that the bottom of the bag would hang just above my hip bone—to fall in the hollow of my waist.
Just measure the length you want, plus about 4 inches to insert in the top corners of your bag (2 inches on each side will go into the bag), and as wide as you want, allowing for 1/4- to 1/2-inch seam along the length of the strap. So, mine measured about 28 inches by 3 inches. Cut it out.

Turn down the side edge about 1/4 inch along the length of the strap and straight stitch all the way down for the side hem. Do the same on the other side. Then, fold it in, lengthwise, right sides out, and sew about 1/4 inch in—along the stitches you already made while hemming the edges. So, with my width measurement, you’ll end up with a strap about 1 1/4 inches wide.
Prepare and place the strap into the bag:
Now, take the body of the purse in your hands and fold in the sides of the “neck” to make a pleat at the top, where you will insert the strap (right).
Insert one end of the strap—about two inches or so (see below).
“After” thought: I changed my tut by extending the length of the “insert tab” part of the strap from an inch to two inches. After using my bag, I realized it needs more stability.

Then, pinch closed the pleat around the strap end (right) , and sew it together. Be sure to sew back and forth a few times, even in an “X” across the strap to hold it firmly to the body of the bag, to withstand the weight of what you will carry in it.
It’ll look like this (below).


Make “covers” :
In order that the raw edges won’t be seen, you will next make “covers” for where the strap connects to the body of the purse:
 Cut two squares (as on left)— one for each end of the strap, each 4×4 inches. On each one, hem opposite sides about 1/4 inch (below).
Then, fold it, right sides together, so the raw-edged sides meet for a seam and sew (left).
Turn it right side out.
Do the same for the second square.
When both are finished, you will have two tubes. Run both onto the strap. Push tube #1 down over the raw edges of where you already attached the strap to the body of the purse, turning the seam of the tube to face the back of the purse. Hand sew a couple of stitches on the bottom back of the tube to the body of the purse just below where it meets the strap.  Then, scrunch down the tube (left) till it measures about two inches from top to bottom and hand sew a couple of stitches to secure the scrunched-down tube to the back of the strap.
Now, attach the other end of the strap to the body of the purse by the same method of making a pleat, inserting the strap in the pleat and sewing it together. But, before you sew, check to be sure the strap isn’t twisted.
Now you have a loose tube swinging on the strap. Bring tube #2 down over the other strap end to cover the raw edges of where you attached the strap to the body of the purse. Do the same as before: Turn the seam of the tube to the back and hand sew a couple of stitches on the bottom back of the tube to the body of the purse. Scrunch down the tube to a height of two inches, secure the top of the tube to the strap.
Next, make your lining:
Use your original pattern for the purse. Lay it on your lining fabric. I used a shower curtain whose floral colors matched the purse fabric. Trace around it on the fabric. I drew a little extra on the bottom (going beyond the paper pattern) because the lining will be a flat bag, fitting inside a fuller bag, so the liner will better fill out the bag.
When you complete the liner, you will NOT turn it inside out. You want the right side of the material to be INSIDE the bag.
First, finish the “neck” the way you did the “neck” of the main body of the purse: Turn the edges down about 1/4 inch around the top of the “neck” over the wrong side of the material and sew a hem. Again, turn that down a 1/4 inch and sew, so the raw edge is inside the hem. Once you finish the top edges, pin your two pieces together, right sides together, and straight stitch from the top of one side, around the curved side, across the bottom, and up the other curved side to the top of the other side. Zig-zag the raw edges to prevent fraying.

Put the liner in the bag:
So, now, you have a flat bag, with the pretty print on the inside, with the hems on the outside of the liner bag. This is what you want. Stuff the liner bag into the purse with the top edges matching, covering the raw edges of the flap sown to the bag. I hand-stitched the liner into the inside of the bag—all along the “mouth” of the purse, following the stitching that was already there from the hemming.
 That’s it! You’ve finished your basic bag!
………………………………………..
Now, for the fun part!
………………………………………………………………………..

Bespangle Your Bag
In a previous tut (above), I showed you how to make an original paper pattern for your own unique purse; then, from it, create a basic bag from the fabric of a wide leg of a thrift pant to avoid the high cost of material in a fabric store. 😀
This is how I decorated my bag:
 First, I looked through my treasure trove of goodies to get ideas. I found this great little belt that I never wear as a belt, and, hey! — the color blends in with my bag!

I played around with it to see how I might want it to look, and came up with this: I used the beaded ends of the belt for dangles on the front of the purse, just below where the strap connects. Then, brought each end across the back of where the strap connects, and down around the edge of the flap, outlining the flap.
Pin down the belt—or, whatever decoration you use, to hold it till you can sew it in place.
Since the belt is much longer, I simply brought each side of the belt to the bottom of the flap, pinning as I went, then sewed it all down. After it was secured, I tied a half knot (and sewed the knot to hold it), and let the rest dangle.
If you’re doing something similar, it needs to be hand sewn on.

Then, get out your beads.
I have a large zip-lock bag of dozens of wooden beads that I found for $3 at a rummage. Also, someone gave me two organization boxes with an assortment of beads in different sizes. And, I got a few beads at Wal-Mart for 98 cents/ small bag.
So, armed with my beads, scissors, bead needle and bead thread, I started in.
(Note: Do not use regular sewing thread for stringing beads. Use beading floss, i.e. bead thread. It’s stronger.)
Start out by anchoring your knotted thread into the edge of the flap at the place you planned to have a string of beads; make a stitch to the right or left (staying on the edge of the flap), then another to bring you back to the knot. It just holds better that way instead of stringing the beads from just one pass of the thread through the fabric. (Note: Keep your stitches “secret”: Keep them inside between the two layers that make up the flap.)
 Start slipping your beads onto your needle and thread. I start out with small beads, with the large bead in the middle, then taper down again.
When you pass your needle though the bottom bead on your string, encircle the bead, then, pass the needle and thread back through all the other beads till you get back up to the top of the string.
“After” thought: String it back through a second time, if you want. One of my strings broke with use. Better to make it more secure.
Tighten the string of beads by holding the bottom bead with the fingers of one hand, and gently pulling the thread taut through the string of beads with the other—but give it a little leeway: Allow it to relax, not be so tight that it pulls funny. You want the strings of beads to swing happily. Tie it off securely. After you knot it, insert the needle and thread back into the edge of the flap for a stitch, then closely trim off the thread.
Just keep adding as many strings of beads as you wish. I have a string on each side of the knot on the bottom of the flap, and three on each side.


It’s amazing how a few little embellishments can really put ZING into your project!

……………………………………………………..
Please “like” and “share” on Facebook, Twitter, Pinterest, etc. using the buttons below.
I’d love to hear your comments!!! Lemme know whatcha think!
I love your bag. Those are my colors!
Again, I would amend this tut, Katie: Make your handle longer and insert it further down into the purse to make it sturdier and more able to carry more weight.
Thank you Cindy. Love your tutorials. Sometimes I cant make head or tail with some folks instructions. Yours are so clear to me. 🙂
Yea!! That makes me feel good! I try to write it so, if I were reading it, would it make sense to me?