


For a project that’s loads o’ fun to wear, and so simple and EASY to do…this is it!
…………………………………………………………
 Get a large scarf:
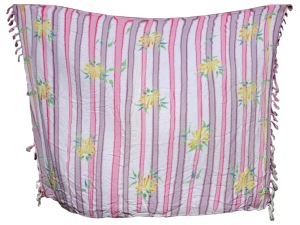
Find a large, spiffy scarf. Mine is wide enough to extend across my shoulders to my wrists, and the length goes down to my hips, and beyond.
But, it would also be cute even smaller: You could make one that’s just over your shoulders, with a length that goes to your waist.
Because this kimono is sewed up on the sides, it can be comfortably worn alone as a top, no matter the size.
I found my neat scarf—which, judging from the print, was made in India ❤ —hidden in a mound of clothes at a Goodwill Outlet, which means I bought it for $1.19/ lb. And, you know a lightweight item like this was only a pound or so. 😀 I looked online, and kimono tops start in the $20-somethings and go up in price!…compared to this dollar or so?…no comparison!!
…………………………………………………………

Find your “center”:
To start, fold your large scarf in “half”—but, on mine, I made the back a little longer than the front. Then, fold again the other way to find your center point.
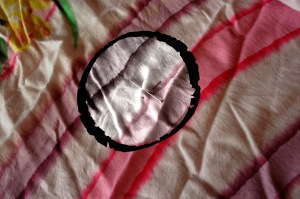 Mark it with crossed pins (circled on left).
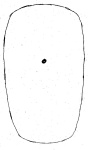
Make a pattern for the neck hole:
For my neck hole, I planned for the finished oval to be about 5 inches by 8 inches. So, in drawing my pattern, I made a slightly smaller oval of about 4 1/2″ x 7 1/2″ to allow for turning the edge under 1/4 inch, twice, for the hem.
I put a mark on the pattern (above) in the center of the width, but a little above center on the length so the neck would be a little lower in front than in back. When I laid the paper pattern on the fabric, I matched the mark on the paper to the crossed pins on the fabric. Be careful to keep the paper oval straight on the material so the neck won’t be crooked. The stripes on mine made it easier to line it up straight. 🙂
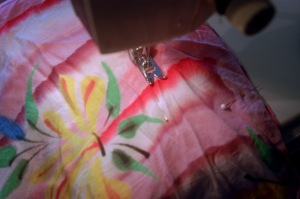
Cut the neck hole:
I pinned down the pattern and, holding my breath—saying, “Well, here goes!” —cut.
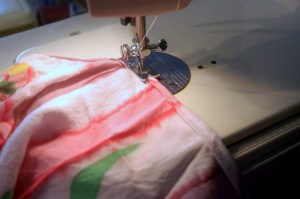
Hem the neck hole:
After you cut out your neck hole, take it to your machine. Be sure to match your spool thread and bobbin thread color with the color/s in the material.
So, I turned over the edge 1/4 inch all around the neck, pinned, and sewed it down. Then, turned it over again 1/4 inch, pinned, and sewed it down. Make sure you hem it from the wrong side of the fabric.

 Make side seams:
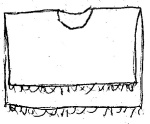
Now for the sides: On a large table, fold your kimono as it will hang on you when you wear it, with the shoulder fold on top—this time, right side out. On one side, measure down from the top fold, 10 inches, and in from the side, 3 inches. Make a line of pins from that point, parallel to the side, 10 inches long. Do the same on the other side (as shown above). Sew both 10-inch side seams, removing the pins as you sew. I sewed two rows of stitches close together to make it more secure.
I considered that it might be easy to accidentally tear the fabric at the end points of the seams, so, to prevent that, I sewed some rows of stitches (three, close together) perpendicular across the top and bottom (as in the above diagram).
Finished!! 😀


Now, try it on in front of your mirror, and dance a little—It’s fun to see it flow around gracefully! ❤
Please “like” and “share” on Facebook, Twitter, Pinterest, etc. using the buttons below.
oh, I love this. I don’t know that I have ‘one’ scarf quite large enough but will now be keeping my eyes open at the thrift stores!!
Yeh bud!! Kim, this is so easy!! DO IT!
Blessings, dear girl!
Cindy