


Hey,
A lovely sari was given to me by my jewelry friend Teresa at the flea market, a while back.
It’s been awaiting a make-over. Lol. I decided to create a kimono from this flowing fabric.

- Because a sari is several feet long, you will need to cut the length.
Measure how long you want your kimono, and multiply it by two, as it will be folded at the shoulders. I decided on about three feet, which translates to six feet, total length.
2. After it is cut to your specified length, pin, then, hem all around the edges. I simply turn over the edge twice, about 1/4 inch each time.


3. Fold the length in half. Pin it together all around. Then, quarter it, by folding it again, and pin it all the way around to hold it in place.

4. Cut out a neck hole. You can use a t-shirt as a pattern, by laying it on top.

This next thing requires you to be super cautious:
5. As your piece is still folded in quarters (and pinned down to hold the fold—lol, I made a rhyme!), separate the layers of fabric so that you are dealing with only the outside layer, which will be the front of your kimono.

Very carefully cut along the center fold from the bottom up to the neck hole.

I also extended the neckline, and—actually, when I hemmed the neck and front opening, I straightened the lines even more.

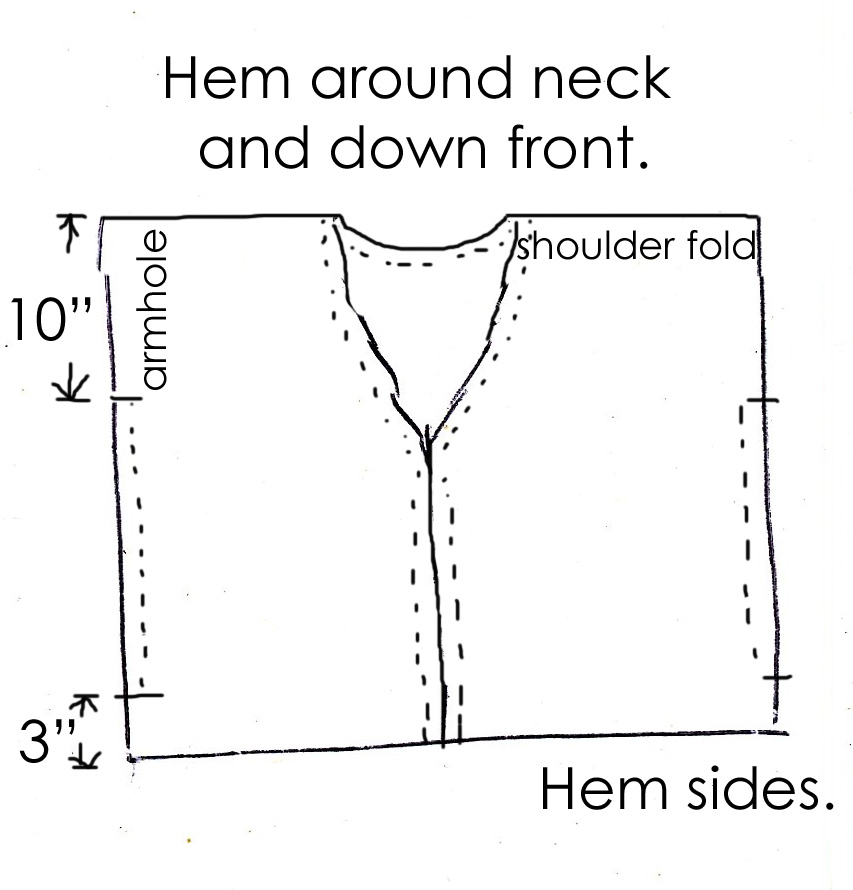
6. Hem the front opening and neck.
7. Now, open it up to only one fold, as shown—only, be sure it is inside out, and pin the sides, in prep for the seams. The appearance will be nicer if the side edges are inside.
Allow 10 inches from the shoulder fold, down, for the armholes, and a three-inch-long slit on the bottom of the side.
So, you will begin to sew your side seams 10 inches from the top and will continue down to end at the three-inch mark.
Then—YOU’RE FINISHED!


I was excited to put together an outfit of ALL my own creations!!
- My Magnolia hat
- My Bohemian bag
and, of course,
- my new Kimono Wrap on this tut.
FUN STUFF!!


Please
Pin the image below on your Pinterest fashion board!

Thanks for stopping by!
I’d love to hear from you…
Please comment below, and “like” and share.


Hi Cindy, Your tutorials really give me inspiration to bring my creative me into form. I use to stitch little bit my Indian clothes. But since I have come to Australia, I don’t get to wear them much. I only wear my Indian clothes for parties or going to our temple. But when I see your pics, I really want to create some magic. Thanks for sharing.
Aw… Gursimrat, thank you so much! I LOVE stuff made in India or made by an Indian woman! Whenever I’m thrifting and find something made in India, it just makes me smile! The beauty of the textiles and the stitch work and sequins, and so much more, make it so beautiful. And I so admire Indian women—y’all are so beautiful!!
You are SO creative! I love the scarft makeover, very cute. With your tutorial, I think even I could make kimono out of a scarf!
Sure you could!!! Just DO it!
Great DIY, easy to follow instructions, thanks for sharing!
Thnx for assuring me of the easiness of my instructions. <3
Wow! I always love any DIY idea!
Thank you So much for sharing
And, than you so much for commenting!!
I didn’t realize a kimono wrap would be so easy to make! Yours turned out great!
Yea! Thank you, Eileen! Your comment means so much! Now, you get to work on yours!! 🙂
I like the creativity you always bring with your style. Thanks for sharing.
You’re so kind, John. Thnx!!
Your posts are well written and being Indian i can relate to the length of the saree 🙂 your posts full of creativity and very simple language so easy navigate through . Thanks
Thank you, Kalyon!! It’s good to hear that my posts are easy to read, and thank you for your compliment on my creativity!! I REALLY appreciate that! 🙂